2015. 11. 30. 18:15

-- 테이블 목록 조회
SELECT OBJECT_NAME

FROM USER_OBJECTS
WHERE OBJECT_TYPE ='TABLE'
ORDER BY OBJECT_NAME

-- 칼럼 목록 조회
SELECT TABLE_NAME, COLUMN_NAME, DATA_TYPE, DATA_LENGTH, DATA_PRECISION, DATA_SCALE, NULLABLE

FROM COLS
-- WHERE TABLE_NAME NOT LIKE '%SYNC'
ORDER BY TABLE_NAME, COLUMN_ID


※ Oracle SID 확인
SQL> select instance from v$thread;

※ Oracle DB_NAME 확인
SQL> select name from v$database;

※ Oracle User 확인
SQL> select * from all_users;

※ 등록된 User 목록 보기
SQL> select username, user_id from dba_users order by username;

※ User가 소유한 모든 테이블 보기
SQL> select table_name from user_tables;

※ 사용자 정보 확인
SQL> select username, default_tablespace,temporary_tablespace from dba_users;

※ 오브젝트 조회
SQL> select * from all_objects where object_name like '명';

※ 테이블 조회
SQL> select * from all_tables where table_name like '명';

※ 시퀀스 정보 보기
SQL> select * from user_sequences;

※ 시노님 조회
SQL> select * from all_synonyms where synonym_name='명';

※ 테이블 인덱스 정보 조회
SQL> select * from user_indexes where table_name='테이블명';

※ 테이블의 컬럼 정보 조회
SQL> select * from all_tab_columns where table_name='테이블명';

※ table comment 쿼리
SQL> select * from all_tab_comments where table_name='테이블명';

※ column comment 쿼리
SQL> select * from all_col_comments where table_name='테이블명';


cf) http://blog.daum.net/dmno21/28

'Database' 카테고리의 다른 글

10G purge 휴지통 비우기/복원 기능  (0) 2015.05.12
sqlplus 백스페이스 사용  (0) 2014.10.19
Flashback Technology  (0) 2014.10.15
Oracle Event Tour  (0) 2014.10.10
AWR Report  (0) 2014.09.29
Posted by 아도니우스
2015. 6. 24. 11:29

1. java -XX:+PrintFlagsFinal -version


2. Understanding CMS GC Logs

   https://blogs.oracle.com/poonam/entry/understanding_cms_gc_logs


3. Tomcat 정보

   톰캣설치디렉토리/bin]# ./version.sh  또는  ./catalina.sh version
   Using CATALINA_BASE:   /usr/local/tomcat/lucy_8080
   Using CATALINA_HOME:   /usr/local/tomcat/lucy_8080
   Using CATALINA_TMPDIR: /usr/local/tomcat/lucy_8080/temp
   Using CATALINA_LOGDIR: /home/www/backup/tomcatlog
   Using JRE_HOME:       /usr/local/jdk6
   Server version: Apache Tomcat/5.5.17
   Server built:   Apr 14 2006 02:08:29
   Server number:  5.5.17.0
   OS Name:        Linux
   OS Version:     2.6.9-78.ELsmp
   Architecture:   i386
   JVM Version:    1.6.0_13-b03
   JVM Vendor:     Sun Microsystems Inc.

   (이거 말고 다르게 보는 방법)
   cat RELEASE-NOTES 
   $Id: RELEASE-NOTES 351503 2005-12-01 22:12:48Z keith $
   Tomcat 5.5 is designed to run on J2SE 5.0 and later, and requires

   마이너 버젼까 확인하기 위해서는.. jar 를 풀어서.. properties를 보면 확인이 가능합니다.
   jar xf /server/lib/catalina.jar  org/apache/catalina/util/ServerInfo.properties

   grep -r 'number' org/apache/catalina/util/ServerInfo.properties
  ./org/apache/catalina/util/ServerInfo.properties:server.number=5.5.17.0


 1. 톰캣이 설치된 경로로 이동(lib까지)

    위 경로가 아니면 명령어로 확인 불가


2. 다음의 명령어로 버전확인

   java -cp catalina.jar org.apache.catalina.util.ServerInfo


'Java' 카테고리의 다른 글

“top threads” plugin for JConsole  (0) 2014.12.16
Hotspot JVM GC 방식  (0) 2014.12.09
[모델1] 간단한 로그인 시스템  (0) 2014.11.01
Path 클래스 사용하기  (0) 2014.10.01
singleton 패턴  (0) 2014.10.01
Posted by 아도니우스
2015. 6. 19. 14:32

소개

아파치를 중단하고 재시작하려면 실행하고 있는 httpd 프로세스에 시그널을 보내야 한다. 시그널을 보내는 방법은 두가지다. 하나는 유닉스 kill 명령어를 사용하여 프로세스에 직접 시그널을 보내는 방법이다. 시스템에 많은 httpd가 실행되지만, PidFile에 pid가 기록된 부모외에 다른 프로세스에 시그널(signal)을 보내면 안된다. 즉, 부모이외에 다른 프로세스에 시그널을 보낼 필요가 없다는 말이다. 부모에게 보낼 수 있는 시그널은 세가지로, 이제 설명할 TERM, HUP, USR1이다.

다음과 같이 부모에게 시그널을 보낸다:

kill -TERM `cat /usr/local/apache2/logs/httpd.pid`

httpd 프로세스에게 시그널을 보내는 다른 방법은 명령행 옵션 -k를 사용하는 것이다. 아래서 설명할 stop, restart, gracefulhttpd 실행파일의 아규먼트들이다. 그러나 이 아규먼트들로 httpd를 실행하는, apachectl 스크립트를 사용하길 권한다.

httpd에 시그널을 보낸후, 다음 명령어로 진행상황을 알 수 있다:

tail -f /usr/local/apache2/logs/error_log

위 예를 당신의 ServerRootPidFile 설정에 알맞게 수정하라.

top


당장 중단

시그널: TERM
apachectl -k stop

TERM이나 stop 시그널을 부모에게 보내면 즉시 모든 자식을 죽인다. 자식을 완전히 죽이는데는 몇 초가 걸릴 수 있다. 그런후 부모가 종료한다. 처리중인 요청은 중단되고, 더 이상 요청을 받지않는다.

top


점잖은 재시작

시그널: USR1
apachectl -k graceful

USR1이나 graceful 시그널을 부모에게 보내면 부모 프로세스는 자식들에게 현재 요청을 처리한후 종료하라고 (혹은 현재 아무것도 처리하지 않다면 즉시 종료하라고) 조언한다. 부모는 설정파일을 다시읽고 로그파일도 다시 연다. 자식이 죽을때마다 부모는 죽은 자식대신 새로운 설정 세대에 기초한 자식을 실행하여 즉시 요청을 처리하게 한다.

점잖은 재시작(graceful restart)으로 USR1을 사용할 수 없는 플래폼에서는 대신 (WINCH와 같은) 다른 시그널을 사용할 수 있다. apachectl graceful은 플래폼에 알맞은 시그널을 보낸다.

점잖은 재시작은 항상 MPM의 프로세스 조절 지시어 설정을 고려하여, 재시작동안 클라이언트를 서비스하는 프로세스나 쓰레드가 적당한 수를 유지하도록 설계되었다. 게다가 StartServers는, 일초 후 최소한 StartServers만큼 새로운 자식이 안만들어지면 자식이 StartServers 개가 되도록 새로 만든다. 즉, 프로그램은 서버의 현재 부하에 알맞은 자식의 개수를 유지하며, StartServers 파라미터로 지정한 당신의 기대를 존중한다.

mod_status 사용자는 USR1을 받을때 서버 통계가 0이 되지 않음을 봤을 것이다. 서버는 새로운 요청을 (운영체제는 이들을 큐에 담아서 어떤 경우에도 잃어버리지 않는다) 처리하지 못하는 시간을 최소화하고 당신의 튜닝 파라미터를 존중하도록 만들어졌다. 이를 위해 세대간 모든 자식을 기록하는 scoreboard를 유지한다.

status 모듈은 또한 점잖은 재시작 전에 시작하여 아직도 요청을 처리하고 있는 자식을 G로 알려준다.

현재로는 USR1을 사용하는 로그순환 스크립트가 재시작전에 모든 자식이 로그작성을 마쳤는지 알 수 있는 방법이 없다. 우리는 USR1 시그널을 보내고 적당한 시간이 지난후 이전 로그를 다루도록 제안한다. 예를 들어 낮은 대역폭 사용자의 경우 접속 대부분이 마치는데 10분이 안걸린다면, 이전 로그를 다루기전에 15분 기다린다.

설정파일에 오류가 있다면 재시작시 부모는 재시작하지 않고 오류를 내며 종료한다. 또, 점잖은 재시작의 경우 종료할때 자식이 실행되도록 놔둔다. (자식들은 자신의 마지막 요청을 처리하고 "점잖게 종료한다".) 이는 서버를 재시작할때 문제가 된다. 서버는 자신이 기다릴 포트에 연결하지 못한다. 재시작전에 -t 명령행 옵션(httpd 참고)으로 설정파일 문법을 검사할 수 있다. 그러나 이런 검사도 서버가 올바로 재시작할지를 보장하지 못한다. 설정파일의 문법이 아닌 의미를 검사하려면 root가 아닌 사용자로 httpd를 시작해볼 수 있다. root가 아니기때문에 (아니면 현재 그 포트를 사용하는 httpd가 실행되기때문에) 오류가 없다면 소켓과 로그파일을 열려고 시도하는 과정에서 실패할 것이다. 다른 이유때문에 실패한다면 아마도 설정파일에 오류가 있을 것이다. 점잖은 재시작을 하기전에 오류를 고쳐야한다.
top


당장 재시작

시그널: HUP
apachectl -k restart

HUP이나 restart 시그널을 부모에게 보내면 TERM과 같이 모든 자식을 죽이지만 부모는 종료하지 않는다. 부모는 설정파일을 다시읽고 로그파일을 다시 연다. 그리고 새로운 자식들을 만들고 서비스를 계속한다.

mod_status 사용자는 HUP를 보내면 서버 통계가 0이 됨을 알 수 있다.

설정파일에 오류가 있다면 재시작을 해도 부모는 재시작하지 않고 오류를 내며 종료할 것이다. 이를 피하는 방법은 위를 참고하라

'Apache' 카테고리의 다른 글

SSL 인증서 비밀번호 제거하는 방법  (0) 2015.06.03
apache 로그 관리  (0) 2014.10.02
httpd-mpm.conf  (0) 2014.08.27
Apache 버전 및 MPM 확인 방법, Graceful  (0) 2014.08.26
Apache Sticky Session  (0) 2014.07.28
Posted by 아도니우스
2015. 6. 3. 13:59

SSL 인증서 키에 비밀번호가 걸려있을때 비밀번호를 제거하는 방법.


~]# openssl rsa -in ssl.key -out ssl_nopass.key

     Enter pass phrase for ssl.key: 비밀번호 입력


SSL 인증서 생성시 인증키 값을 넣을경우
아파치 구동시 키 비밀번호를 입력하지 않으면 구동되지 않는다.

서버를 관리하는 입장에서는 비밀번호를 입력하지 않고 자동으로 웹서버를
구동하여야할때가 있다.
 
인증서 생성시 이미 넣어버린 키는 아래와 같이 하면 간단하게 없앨 수 있다.
단, 당연한 이야기지만 기존 비밀번호는 알고있어야한다.-.-;

cp server.key server.key.org
openssl rsa -in server.key.org -out server.key

다시 아파치를 stop후 start해본다.

cf) http://blog.bbom.org/45

cf) http://blog.naver.com/PostList.nhn?from=postList&blogId=xers1&categoryNo=56&currentPage=10


'Apache' 카테고리의 다른 글

Apache 중단과 재시작  (0) 2015.06.19
apache 로그 관리  (0) 2014.10.02
httpd-mpm.conf  (0) 2014.08.27
Apache 버전 및 MPM 확인 방법, Graceful  (0) 2014.08.26
Apache Sticky Session  (0) 2014.07.28
Posted by 아도니우스
2015. 5. 12. 08:43

   휴지통(Recycle Bin) 에 들은 테이블 조회

   SQL> show recyclebin;

            휴지통의 모든 내용이 비워집니다.

   SQL> purge recylcebin;

            삭제된 테이블은 되사

   SQL> flashback table 테이블명 to before drop;

           만약, 특정 테이블을 휴지통에 남기지 않고 모두 삭제하려면..

   SQL> drop table 테이블명 purge;

          purge 문 없이 그냥 drop 한 후에는

   SQL> purge table 테이블명;

'Database' 카테고리의 다른 글

Oracle schema 조회  (0) 2015.11.30
sqlplus 백스페이스 사용  (0) 2014.10.19
Flashback Technology  (0) 2014.10.15
Oracle Event Tour  (0) 2014.10.10
AWR Report  (0) 2014.09.29
Posted by 아도니우스
2015. 3. 24. 08:30
[문과생 취업난 시대 새풍속도 ‘코딩’ 열풍] “떡잎부터… 이공계형 인재로” 초등학생 과외 

컴퓨터 전공자나 배우는 것으로 여겼던 ‘코딩’이 초등학생 ‘과외 목록’에까지 등장했다. 인문계 취업난이 갈수록 심해지자 자녀를 어려서부터 이과형 인재로 키우려는 학부모가 크게 늘었다. 정부도 2018년부터 소프트웨어 과목을 초·중학교 정규교과에 포함시키려 한다.

서울 서초구의 초등학교에 다니는 A군(10)은 매주 일요일 아침 동네 카페에서 한국과학기술원(KAIST) 학생에게 코딩 과외를 받는다. A군 학교는 지난해 교내 컴퓨터실에 애플의 매킨토시 컴퓨터 수십대를 설치하고 코딩 수업을 시작했다. 학교 수업에서는 미국 매사추세츠 공과대학(MIT) 미디어랩이 개발한 교육용 코딩 프로그램 ‘스크래치’를 쓴다. 이 수업을 따라가려면 과외가 필요했다. A군과 비슷한 처지의 초등학생이 많다보니 온라인에서는 “코딩 가르쳐줄 컴퓨터공학 전공자를 찾는다”는 학부모들의 글을 쉽게 찾을 수 있다.

10년 전 초등학교에도 컴퓨터 교육은 있었다. 하지만 워드 프로세서 등 문서 작업을 위한 프로그램 ‘사용법’을 주로 가르쳤다. 요즘 초등학생들이 배우는 코딩은 훨씬 고차원적인 프로그램 ‘제작법’이다. C언어나 자바 등 대학교 과정에나 나왔을 컴퓨터언어를 이용해 직접 프로그램을 만든다.

이런 현상은 요즘 세대의 성장 배경이 과거와 완전히 다른 데서 비롯됐다. 요즘 초등학생들은 어릴 때부터 스마트폰 태블릿PC 등 각종 전자기기에 둘러싸여 자랐다. 윗세대에 비해 컴퓨터 기술을 자연스럽게 습득하고 작동 원리를 쉽게 이해한다고 전문가들은 평가한다. 이런 세대를 가리켜 ‘테크 네이티브(Tech Native)’라는 단어까지 등장했다.

코딩 교육 열풍은 세계적인 추세이기도 하다. 영국 정부는 지난해부터 모든 초·중·고교에서 코딩을 필수 교과목으로 가르치도록 했다. 김진형 미래창조과학부 소프트웨어정책연구소장은 “어린이들에게 코딩을 가르치는 건 미래사회에 대비하는 필수 단계”라며 “다른 나라에 비해 늦은 감은 있지만 지금부터라도 국가적 역량을 키워 나가야 한다”고 말했다.


[문과생 취업난 시대 새풍속도 ‘코딩’ 열풍] 국민대 “전공 불문… 프로그램은 필수” 기사의 사진


국민대에 입학하는 학생은 이제 인문계·예체능계 등 비(非)이공계도 컴퓨터 프로그램을 제작하는 ‘코딩’ 과목을 이수해야 졸업할 수 있다. 

국민대는 두 학기에 걸쳐 진행되는 ‘컴퓨터 프로그래밍Ⅰ·Ⅱ’를 전교생 필수과목으로 개설해 올 신입생부터 모든 학과 학생이 수강토록 했다고 23일 밝혔다. 프로그래밍 기술이 IT(정보통신) 분야를 넘어 인문·예술·체육·경영 등 거의 전 분야와 결합해가는 현실을 반영한 조치다. 

이공계 수업으로 분류돼온 프로그래밍 과목을 전교생이 수강토록 의무화한 것은 국내 대학 중 처음이다. 유지수 총장과 보직교수들은 학생들이 전공을 불문하고 컴퓨터언어를 이해해야 하는 시대라는 데 공감해 이런 결정을 내렸다고 한다. 

학생들은 수업에서 컴퓨터 프로그램(소프트웨어)을 설계하는 작업인 코딩 등을 배우게 된다. 첫 학기에는 각종 계산과 데이터 분류 등에 가장 일반적으로 쓰이는 엑셀과 워드 프로그램, 미국 매사추세츠공과대학(MIT)이 개발한 기초 프로그래밍 언어 ‘스크래치’ 등을 익힌다. 이런 과정이 학습·연구는 물론 취업 후 업무에도 도움이 될 것으로 보고 있다. 

두 번째 학기에는 개발자용 언어인 ‘파이선’과 함께 소프트웨어의 알고리즘과 데이터 조직화를 본격적으로 배운다. 오프라인 강의, 동영상 수업, 실습 및 프로젝트 수행을 병행한다. 과목을 모두 이수하면 간단한 게임이나 채팅·메신저 프로그램을 만들 수 있다고 학교 측은 설명했다. 

국민대는 정해진 시간 안에 주어진 주제와 관련한 프로그램을 만들어내는 대회, 학생들이 개발한 소프트웨어를 소개하는 전시회 등도 개최할 계획이다. 또 소프트웨어 개발에 남다른 역량과 열정이 있는 학생들은 별도 프로젝트팀을 구성해 지원할 방침이다. 

프로그래밍 필수과목 개설을 주도한 이민석 컴퓨터공학부 교수는 “소프트웨어는 모든 전문 분야에서 전혀 새로운 가치를 창출하는 핵심 동력”이라며 “이 과목을 이수하면 자기 전공이나 전문 영역에서 추구해야 할 가치들을 소프트웨어를 이용해 효과적으로 만들어낼 수 있을 것”이라고 말했다.

'기타' 카테고리의 다른 글

IT 경영전략 - 전략 수립 도구  (0) 2014.10.31
WORLD IT SHOW  (0) 2014.10.21
핀테크(fintech)  (0) 2014.10.20
Posted by 아도니우스
2015. 2. 12. 17:47

Create your first SOA Composite - Hello World ! Process


 Start JDeveloper.  Left click Applications node in the Applications Navigator and select New Application, as shown


Create an Application named Training.

Give “Training” in Application name

Select a suitable location and select SOA Application in the Application Template


The wizard now prompts you to create a project.  Later, you can add more projects to this application.

Give the project name as HelloWorld

Select Composite template as Composite with BPEL Process.  This is a convenient shortcut to tell that the composite we want to create would contain one BPEL process.  As an alternative, we can choose Empty Composite here,  add add a BPEL

 component later.

Click on Finish


A new dialog opens up.  This is to configure the BPEL component that we are adding to our composite.

Give name as HelloWorld_BPEL

Select Template as Synchronous BPEL Template and click ok.

 Templates are pre-defined structures provided by Oracle.  Essentially, by using a template, a few activities shall come by default, so that you are saved of the mundane steps of adding those activities.  It’s even possible to create your own custom templates.  As of now, we select the predefined template for a synchronous process.  A synchronous process is one which is expected to be comparatively short-lived (few seconds to minutes) and hence can be expected to return a response quite quickly.  So, the client invoking a synchronous process can afford to wait (and block) for the response to come back.


The following structure comes up.


This is the picture of the composite (more technically, it’s the design time view of composite.xml).  As you can see, it contains a servicecomponent called HelloWorld_BPEL and a binding component called helloworld_bpel_client.


Service components are the building blocks that you use to construct a SOA composite application. Examples - BPEL, Human Task, Business Rules, Mediators, Spring.


Bindingcomponentestablish a connection between a SOA composite and the external world.  They are categorized as Service binding component and Reference binding components.  Service binding components provide the entry point to the composite Reference binding components provides access to the external service in the outside

world.  Examples include JCA Adapters (FTP adapter, DB adapter, Apps adapter etc), HTTP Binding, Direct binding etc.

Double click on this component to open it up.


As you can see, there is an input coming from the helloworld_bpel_client service binding  (which represents any client that is invoking our BPEL process).  


Drag an Assign activity from the component palette on the right.


In this assign activity, we can add any number of “Copy rules”.  Copy rules allow us to copy values from a source variable to a target variable, or to assign result of an expression (say a concatenate operation or a square root operation) to a target variable.


We want to create an expression similar to

“Hello” + Input = Output.   

This we shall create using the following steps:

Expand output variable so that you can see client:result.  This is the string field to which we want to assign some value.

From the icons on top right corner, drag an expression  onto client:result.


A dialog called Expression Builder opens up.  Expression builder is a nifty tool to quickly create expressions.  It shows categories of operations.  You choose a category and it shows you the expressions within that category.   For example

Here we choose “concat” function from the String Functions category

Click on Insert into expression.  This puts the concat() into the Expression box above.  (When you get experienced, you can simply write functions directly here.).  Place the mouse cursor between “(“ and “)” of the concat function

Next we expand the input and select the client:input field.  This is the field that has got the value that was sent by the user.  We want to append hello to this and assign that to the output variable.  So choose this

Press Insert into expression

Type ‘Hello’ followed by a comma.    Note that in BPEL, (or more precisely xpath) we use single quotes for strings


Now press OK.  Control returns to Edit Assign dialog.  Now expand the outputVariablein the To section (right section) and select client:result field.  Press OK

This has completed the Assign activity.  For better readability we should always give descriptive names to activities.  


So double click on the text “Assign1” (not the icon) and give name as “Assign_Hello”  

The BPEL process is now complete !

Posted by 아도니우스
2015. 1. 8. 17:52

BPEL Persistence properties are used to control, when and how a process need to be dehydrated.

1. inMemoryOptimization

This property indicates to Oracle BPEL Server that this process is a transient process and dehydration of the instance is not required. When set to true, Oracle BPEL Server keeps the instances of this process in memory only during the course of execution. This property can only be set to true for transient processes (process type does not incur any intermediate dehydration points during execution).

  • false (default): instances are persisted completely and recorded in the dehydration store database for a synchronous BPEL process.
  • true: Oracle BPEL Process Manager keeps instances in memory only.


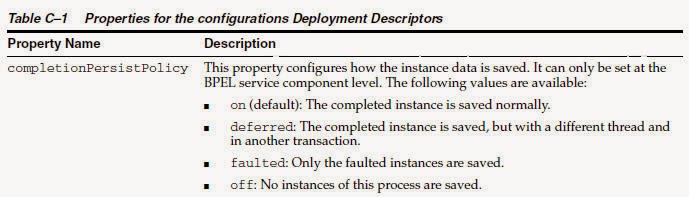
2. completionPersistPolicy


This property controls if and when to persist instances. If an instance is not saved, it does not appear in Oracle BPEL Console. This property is applicable to transient BPEL processes (process type does not incur any intermediate dehydration points during execution).

This property is only used when inMemoryOptimization is set to true.

This parameter strongly impacts the amount of data stored in the database (in particular, the cube_instance, cube_scope, and work_item tables). It can also impact throughput.

  • on (default): The completed instance is saved normally.
  • deferred: The completed instance is saved, but with a different thread and in another transaction, If a server fails, some instances may not be saved.
  • faulted: Only the faulted instances are saved.
  • off: No instances of this process are saved.

<component name="mySampleBPELComponent">
...
<property name="bpel.config.completionPersistPolicy">faulted</property>
<property name="bpel.config.inMemoryOptimization">true</property>
...
</component>


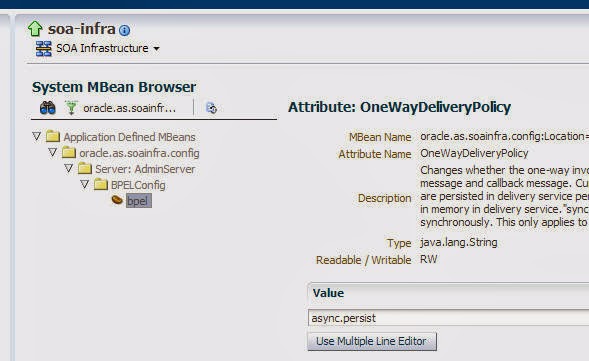
3. oneWayDeliveryPolicy


The oneWayDeliveryPolicy is from the Oracle 10g configuration property deliveryPersistencePolicy.The new configuration property name is bpel.config.oneWayDeliveryPolicy.

This property controls database persistence of messages entering Oracle BPEL Server. Its used when we need to have a sync-type call based on a one way operation. This is mainly used when we need to make an adapter synchronous to the BPEL Process.

By default, incoming requests are saved in the following delivery service database tables: dlv_message

  • async.persist: Messages are persisted in the database.
  • sync.cache: Messages are stored in memory.
  • sync: Direct invocation occurs on the same thread.


<component name="mySampleBPELProcess">
...
<property name="bpel.config.transaction" >required</property>
<property name="bpel.config.oneWayDeliveryPolicy">sync</property>
...
</component>


※ 참고사이트 : http://www.albinsblog.com/2012/04/persistence-properties-in-oracle-soa.html


--------------------------------------------------------------------------------------------------------------

#291 BPEL configuration properties

Rule of thumb for BPEL is - keep those processes short and sweet.
Transient, synchronous is the way to go, if possible.

ORCL docs provide for very good reading in this area - I recommend the FMW Developer Guide for SOA Suite, the FMW SOA Suite Administrators Guide as well as the FMW Performance Guide. The info below, has to a great extent, been taken from there. I also recommend AnTony Reynolds and Matt Wright's - Oracle SOA Suite 11g Developers Guide - available here


Tuning BPEL Engine Threads -


These are the guys who do the actual work -

The dspInvokeThreads property specifies the total number of threads allocated to process invocation dispatcher messages. Invocation dispatcher messages are generated for each payload received and are meant to instantiate a new instance. If the majority of requests processed by the engine are instance invocations (as opposed to instance callbacks), greater performance may be achieved by increasing the number of invocation threads. Higher thread counts may cause greater CPU utilization due to higher context switching costs.


The dspEngineThreads property specifies the total number of threads allocated to process engine dispatcher messages. Engine dispatcher messages are generated whenever an activity must be processed asynchronously. If the majority of processes deployed are durable with a large number of dehydration points (mid-process receive, onMessage, onAlarm, and wait activities), greater performance may be achieved by increasing the number of engine threads. Note that higher thread counts can cause greater CPU utilization due to higher context switching costs.

The dspSystemThreads property specifies the total number of threads allocated to process system dispatcher messages. System dispatcher messages are general clean-up tasks that are typically processed quickly by the server (for example, releasing stateful message beans back to the pool). Typically, only a small number of threads are required to handle the number of system dispatch messages generated during run time.

Start off with the defaults, and tune - if necessary - paying attention to the heuristics above.

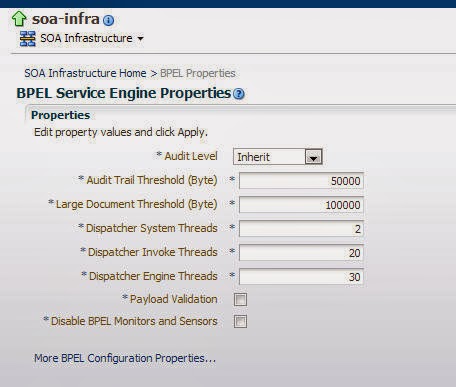
These properties can be set in EM. 


As you can see, the 
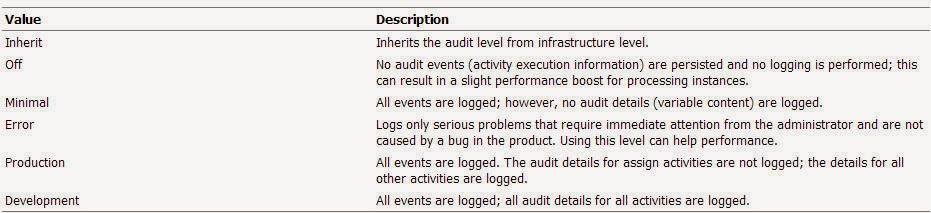
Audit Level is set to Inherit as default. Please see my My Post on Logging for more info.

Here is the doc -


For production systems - use Production or Error - depending on your logging requirements.

Audit Detail threshold - under the threshold? - details store in the audit_trail table.
over the threshold? then audit info will be written to the audit_details table.

Large Doc Threshold - same concept -

This is the maximum size (in kilobytes) of a BPEL variable before it is stored in a separate location from the rest of the instance scope data.

Payload Validationvalidates incoming and outgoing XML documents 
Incurs a performance hit.


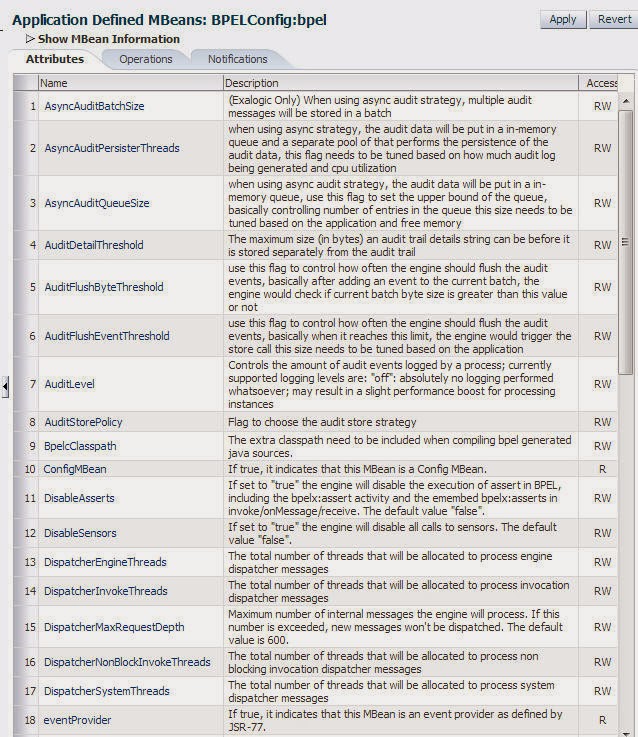
Other Configuration properties


Now let's look at the rest -


As you can see, the descriptions shown in EM are useful and succinct.
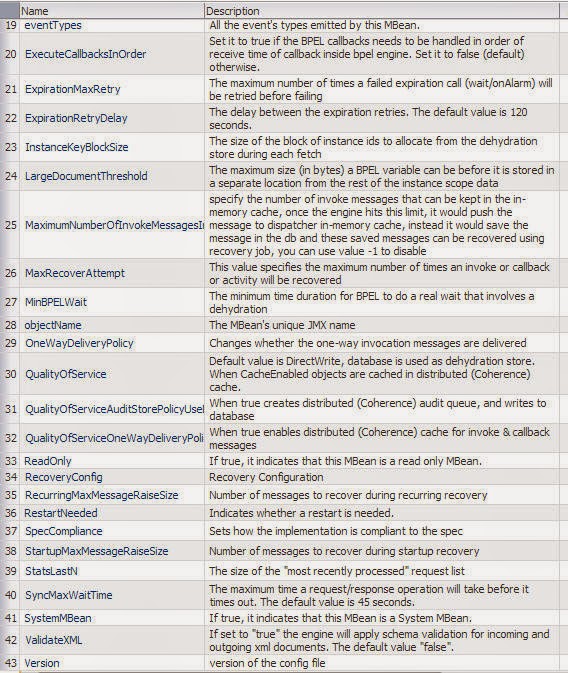
You will not change most of these, however - some are worth investigating -


For one way invokes with possible callbacks -

Per default requests to execute a BPEL process are written to the soa_infra.dlv_message table - this causes a message to be generated that is then picked up by a worker thread which then starts executing the process.

Big benefit - Reliability no requests get lost - however we do have an extra DB write.

If set to async.cache then the request is cached in-memory - better Performance

If set to sync -> queuing is bypassed, and the BPEL process is invoked synchronously.
Client has full control of what happens.


1. bpel.config.oneWayDeliveryPolicy
Default value specified in MBean - accessible from em


async.persist: Messages are persisted in the database hash map.
sync.cache: Messages are stored in memory.
sync: Direct invocation occurs on the same thread.

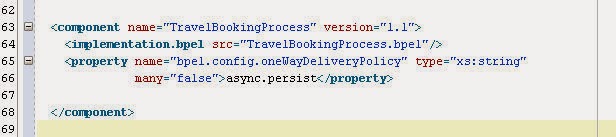
Can be overwritten in the BPEL process definition in composite.xml -


onewayDeliveryPolicy=sync
and
transaction=required
BPEL process runs in the same thread and the same transaction.

onewayDeliveryPolicy=sync
and
transaction=requiresNew
BPEL process runs in the same thread but within a new transaction.

completionPersistPolicy


Here you need to ask yourself, whether the instance data needs to be persisted, and if so to what extent.
If your BPEL process integrates System A with System B. then the fact that the data has been successfully written to B suffices.
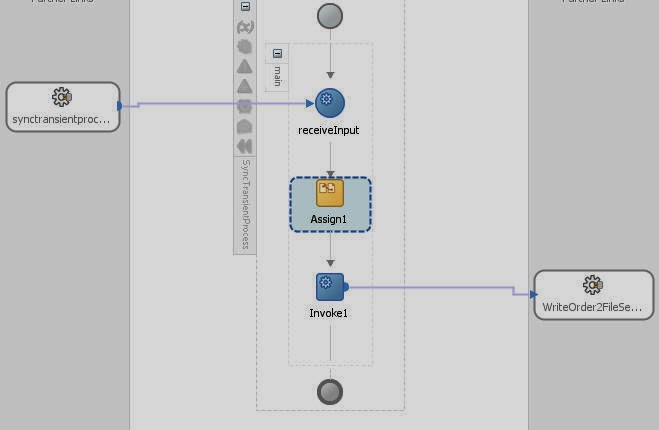
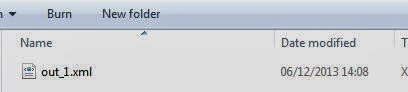
Simple example -

here is my one-way BPEL process that writes its input to a file -


Test - here is the output order.


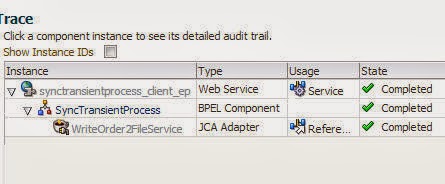
Here is the em trace -
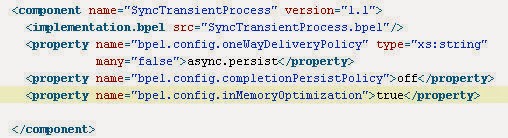


Now I set the the completePersistPolicy to off in composite.xml -
I also need to set inMemoryOptimization = true


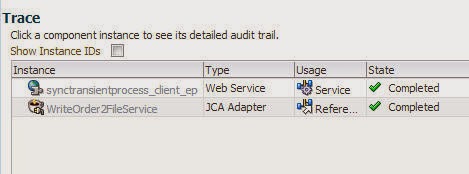
Re-test - my output file has been written.

Check the audit trail in em -


Probably faulted would be the best setting here.

The SyncMaxWaitTime property sets the maximum time the process result receiver
waits for a result before returning. Results from asynchronous BPEL processes are
retrieved synchronously by a receiver that waits for a result from Oracle BPEL Server.
The default value is 45 seconds.

If you have sync BPEL processes and you see the need to up this property, then consider making the processes async.

MaxRecoverAttempt - number of times to attempt recovery of invoke/callback messages.

The recovery behavior for invoke and callback messages is different when
MaxRecoverAttempt is set. For example, assume MaxRecoverAttempt is set to 4.
■ Invoke message recovery is retried 4 (N) times before moving the message to
the exhausted state.
■ Callback message recovery is retried 5 times (N + 1) before moving the
message to the exhausted state.
This is the expected behavior. The first attempt is not counted as a recovery
attempt. The recovery attempts are incremented by the BPEL process service
engine. If MaxRecoverAttempt is set to 1, you see one default resolution process
and then one recovery attempt.

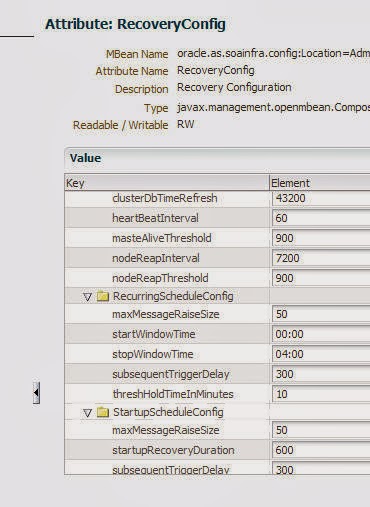
Recovery Configuration


This feature is detailed in the Administrator’s Guide for Oracle SOA Suite and Oracle
Business Process Management Suite


e.g. We are trying to update a DB and it is temporarily unavailable.

This covers -
All activities (for example, wait activities and OnAlarm branches of pick activities)
that have an associated expiration date and are scheduled with the SOA
Infrastructure to be rescheduled
■ All activities that are not complete over a provided threshold time

■ All invoke and callback messages that are unresolved


When should auto-recovery be available?
Check out the RecurringScheduleConfig - set start/stopWindowTime

Check out StartupScheduleConfig -
the default config tells us -

maxMessageRaiseSize The maximum number of messages to submit for each startup
recovery attempt. Use this property to limit the impact of recovery on the server. This value specifies the maximum number of messages to filter from activity, invoke, and callback
queries; that is, 50 messages from each of the activity, invoke, and callback tables.

startupRecoveryDuration -
Specifies the number of seconds that the startup recovery period
lasts. After the server starts, it goes into a startup recovery
period. During this period, pending activities and undelivered
callback and invocation messages are resubmitted for
processing.
The default value is 600 (ten minutes). A negative or zero value
disables startup recovery.


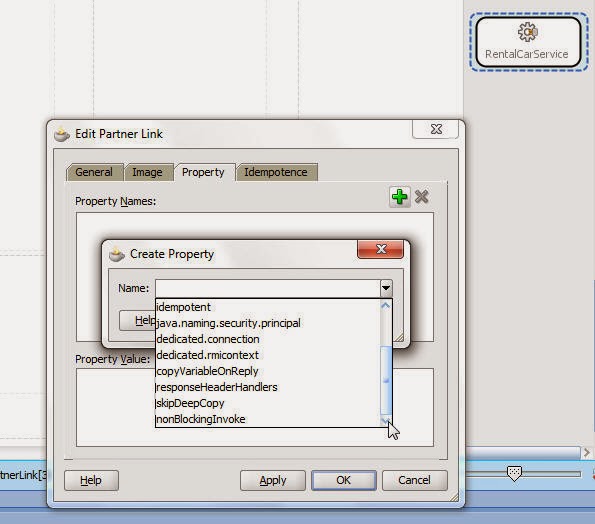
Partner Link Properties

The main ones ares -

nonBlockingInvoke=true
PartnerLink Service will executed in a separate transaction.

idempotent=false
Executes on same Thread/transaction


Posted by 아도니우스
2015. 1. 6. 15:08

JBoss Commnunity 에서 다운로드 한 JBoss 기본 로깅 레벨은 DEBUG 입니다.

구동 시간도 오래 걸리고 로그 메시지도 DEBUG가 추가되므로 보기 힘듭으로 JBoss 설치 후 반드시 기본 로깅 레벨 변경이 필요


<JBOSS_HOME>/server/<CONFIGURATION>/conf/jboss-log4j.xml 파일을 편집기로 열어서 보면 JBoss 5부터 Threshold가 추가되어 있는데 이 옵션의 실제 기본값은 DEBUG 입니다. 따라서 이 값을 변경해주면 기본 로깅 레벨을 변경할 수 있습니다.


 파일을 직접 수정하는 것은 운영환경 구축할 때 유연성이 떨어지므로 JBoss 구동시 다음과 같은 옵션을 추가해서 변경


#cd <JBOSS_HOME>/bin


#run.bat -Djboss.server.log.threshold=INFO


※ 참고사이트 : http://cafe.naver.com/jbossug/1327

'JBoss' 카테고리의 다른 글

admin-console ID,PW 변경  (0) 2014.09.26
web<->was session balancing check  (0) 2014.08.28
JBOSS 바인딩 IP 정의  (0) 2014.08.26
Posted by 아도니우스
2014. 12. 16. 15:32

When working with large (server side) java application, sometimes it would be nice if you could look inside, to see what thread is taking up so much cpu time, and why. Something similar to the Unix top command, but then showing all threads in one (java) application, instead of all processes in the system.

When I was looking for such a monitoring application, I came accross the 2.0 version of MC4J that provides a “Thread Info” panel that displays threads together with CPU usage; exactly what I needed. Unfortunately, there is only an alpha release of this MC4J version, that is not yet perfectly stable. Moreover, the thread info panel doesn’t handle applications with large amounts of threads very well. As the source code of this version of MC4J is not (yet) publically available, this option turned out to be a dead end.

To my surprise, other applications with such functionality are hard to find. There are probably enough profiling applications that can do the job, but I wanted something simple, something JMX-based, that can used also to monitor applications running in production.

There is however something called JTop, which is a plugin for JConsole. It’s actually a demo for the new (since Java 6) JConsole plugin API, that does show CPU usage per thread. It’s fairly basic and only shows total CPU usage, which is not very usefull. You would expect that (after a year), somebody would have extended the demo to something more useful, but as I couldn’t find anything like that, I thought I should give it a try myself.

The result is a JConsole plugin that displays the top threads, sorted by cpu usage in the last sampling period. It also displays cpu usage history, and an average over the last 10 sampling periods.


To avoid ending up with an unresponsive user interface when monitoring applications with large number of threads, I took a few precautions. First of all, the plugin has it’s own refresh rate. It’s independent from the JConsole poll interval, which is 4 seconds by default. For applications with large amounts of threads, this is way too short: only retrieving all thread information can already take 4 or 5 seconds! Although you can change the JConsole poll interval with a command line option, I thought it would be more convenient to be able to change it from the monitoring panel. It’s default set to 10 seconds, which I think is reasonable in most cases. If you notice that cpu usage measurement takes too much of the application under test, just increase the sample period and see the RMI Connection thread that processes these request, sink in the list.

Another precaution was not to list all threads in the table. Displaying thousands of rows in a table is quite useless in any case, and I was afraid it would seriously harm performance. Eventually, diplaying that many rows turned out to be not much of a problem; I guess I still suffer from an prejudice with
respect to Swing performance…

Using MX4J also showed me that in a continuously refreshing table, it’s hard to select a thread in order to see it’s stacktrace. Therefore, in this plugin, tracing a thread is “sticky”: when you click a row in the table, the stacktrace of that thread is shown immediately and is refreshed with each new sample, until you deselect it or select another thread.

Even though having threads sorted by cpu usage is the logical thing to do, it’s not always convenient when you’re studying the results, as rows keeping moving with each refresh. To lock the rows to there current position, click the “fix order” button. The topmost rows (actually all rows with a non-zero cpu usage), will stay where they are. Rows that had a cpu usage of zero, but have a non-zero value in the next sampling periods, will appear just below these rows, to avoid that you oversee any thread that suddenly takes a large amount of cpu time.

You can run the plugin by downloading the jar-file and passing it to JConsole with the plugin option:
jconsole -pluginpath topthreads.jar. When JConsole connects, it should have a seventh tab named “top threads”.

'Java' 카테고리의 다른 글

JVM 현재 설정된 설정값 확인  (0) 2015.06.24
Hotspot JVM GC 방식  (0) 2014.12.09
[모델1] 간단한 로그인 시스템  (0) 2014.11.01
Path 클래스 사용하기  (0) 2014.10.01
singleton 패턴  (0) 2014.10.01
Posted by 아도니우스